
Overview
Pocket Console is a DMX lighting console for iPhone. It is made for film, TV and video production: interview and location work. It patches fixtures, programs groups and looks, controls every parameter each fixture has, and sends DMX over Art-Net, sACN (E1.31) and Bluetooth.
Pocket Console is a console, not a remote. It holds the show data and it sends the DMX. No other software has to be running. Two ideas shape the app:
- Dual control. Every action is available by touch and by command line. Both surfaces read and write the same live state.
- Projects and locations. A project holds one production. A location holds one setup, with its own patch, fixtures, groups and looks.
The app uses these five colors throughout. Learn them once and the interface reads at a glance in the dark.
Getting started
The app opens on Projects.
- Create a project for the production.
- Create a location inside it for the setup.
- Tap the location card to open the console.
The console has four tabs: Fixtures · Looks · Patch · Settings. When you relaunch the app, it reopens the location you used last.
A tutorial runs the first time you open each tab. It points at the real controls on a demo location. To play it again, go to Settings ▸ App.
Projects & locations
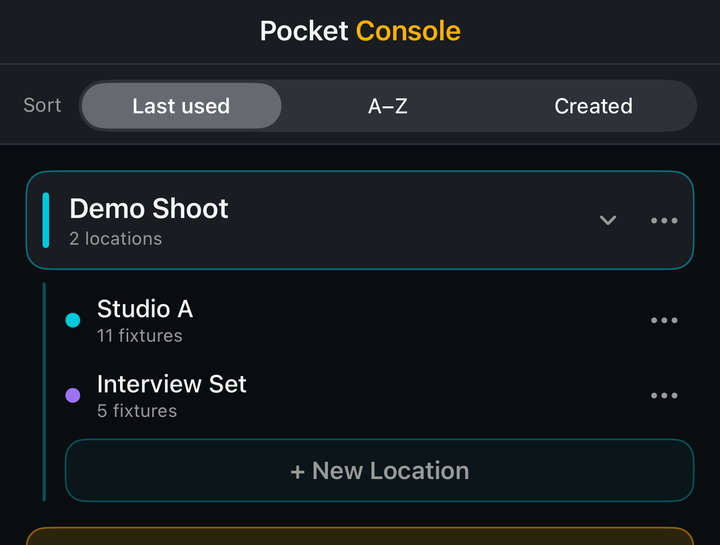
A project is a folder of locations. A location is one setup, and it owns its patch, fixtures, groups and looks.
- A project row expands and collapses. Its ⋯ menu holds Rename, Clone and Delete. Delete asks for confirmation. A project has a name and a color bar, and nothing else.
- A location is a card: a color dot, the name, and the fixture count. Its menu holds Edit, Clone and Delete. Tap the card to open the console.
- + New Location adds a location to a project. + New Project adds a project. A new location can start from a template.
- Sort orders the list by Last used, A–Z or Created.
The Fixtures screen
This is the main control screen. From the top down: a header, the group chips, the fixture grid, the level dock, an action row, and the command bar.
Header

- Title and ‹ Project. Tap the subtitle to close the location.
- Look transport (center). Red ◀, the live look, green ▶. Step through looks without leaving this screen.
- M. Opens the master popover: a master fader and a Blackout toggle. M turns red while blackout is on. Levels in the grid show the effect of master and blackout immediately.
- Filter. Narrows the grid by Group, State (Active, Selected, Has B), Color or Universe. Filtering changes what you see. It does not change what is selected, and hidden fixtures keep their levels and keep putting out light. While a filter is on, the button shows how many fixtures are showing out of the total.
Fixture pills
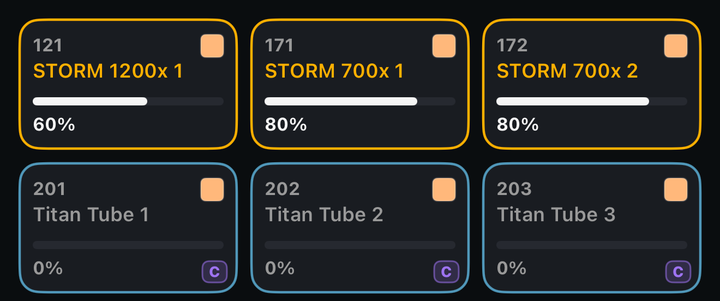
Each pill shows the fixture number, the label, an intensity bar and percentage, and a corner color swatch (the fixture's color at full). The outline is the label color, and turns amber when the fixture is selected. Tap a pill to add or remove it from the selection. A pixel fixture carries a violet C badge; tap and hold it to open its cells.
Swipe sideways across the pills to select a run of fixtures in one movement. The pill you start on and the pill under your finger are the two ends, and everything between them comes with it, so you do not have to touch each one. Drag back toward the start to shrink the run before you let go. A swipe adds to what is already selected, so you can sweep one block, sweep another, then tap single pills to trim. Only fixtures you can see are picked up: anything the filter is hiding stays out of it. The swipe has to start sideways, because a straight up or down drag scrolls the grid. Tap the empty space around or below the pills to clear the selection.
Group chips

One chip per group, tinted in the group's own color. Tap a chip to switch that group on or off. Several groups can be on at once, and the selection is their union. Tap and hold a chip to delete the group. Create groups with Record → Group.
Level dock, action row and command bar
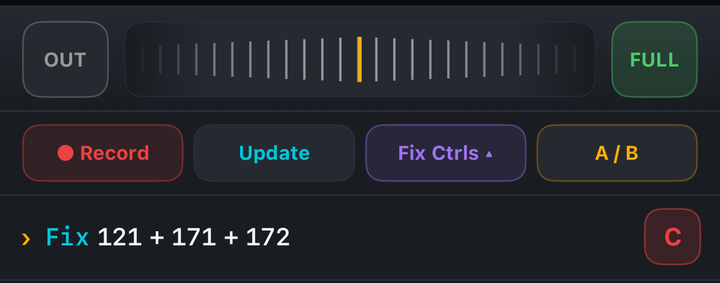
The level dock is the top strip: OUT, the jog wheel, and FULL.
- Jog wheel. Drag the ribbed strip to change intensity. Every selected fixture moves by the same amount, and the wheel keeps spinning after you let go. Double-tap the left, center or right third for −1 stop, the center preset, or +1 stop.
- OUT and FULL. Hold to flash. To lock the value instead, drag up past the threshold, then release.
The action row is below it.
- Record opens the record sheet, for a look or a group. See Looks.
- Update writes the current state back into the live look.
- Fix Ctrls opens the per-parameter controls. See Fixture controls.
- A/B. Hold to preview each fixture's saved B state. While holding, slide up to store the current state as the new B, or slide down to go back. B is saved with the location, so it survives a relaunch. A/B is a compare tool. It is not a look.
The command bar is the bottom strip. It shows the current selection and command. Tap it to open the keypad; the red C clears the line and the selection. The keypad and Fix Ctrls cannot be open at the same time. See Command line.
Fixture controls
Tap Fix Ctrls to show per-parameter controls. The controls are built from the first selected fixture's own profile, so you only ever see parameters that fixture actually has. The row along the bottom filters them by category: All · Int · Color · Beam · Ctrl, and Focus as well on a fixture that pans and tilts.
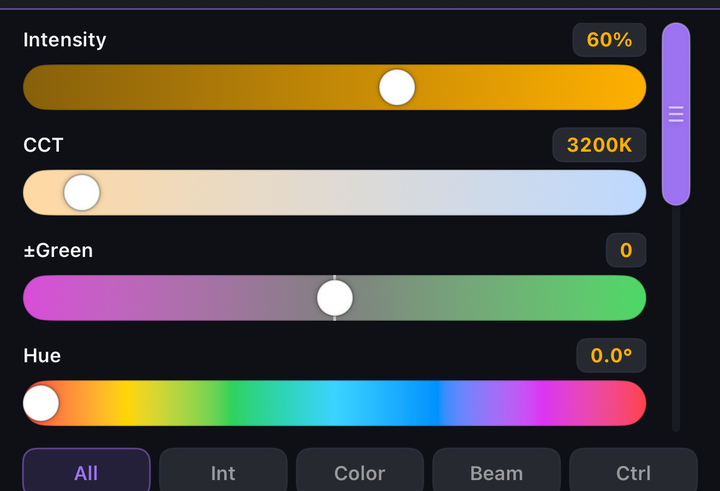
- Each parameter is a slider you drag. Tapping the track does nothing, so you cannot knock a light by accident. The gradient track is the scale, and values read out in real units: Kelvin, degrees, hertz, ±green.
- Tap the value chip to type an exact value. Double-tap the slider to return to the profile default.
- An indexed channel, such as a gobo wheel, a color wheel or an effect selector, becomes a selector. Up to six options render as buttons. More than six render as a dropdown.
- A strobe parameter gets Open and Strobe buttons.
Pixels & cells
A multi-cell (pixel) fixture carries a violet C badge. Tap and hold the pill to open a cell drawer in the grid.
- Up to 12 cells show as labeled cell pills. More than 12 show as a dense color and intensity matrix.
- A cell behaves like a nested fixture. Selected cells drive the level dock, the jog wheel and the fixture controls. With no cells selected, a control on the pixel head moves every cell's dimmer proportionally.
- To address cells from the keypad, use dotted addresses. See Cells and dotted addresses.
★Command line
A command has the form Object → Action → Target, then Enter. A number on its own is a fixture number. The parser ignores case and extra spaces.
How the keypad works
Tap the command bar to open the keypad. The command line has two halves, and they behave differently.
- The selection changes as you type. Digits,
+,−andThrutake effect immediately. They do not wait for Enter. - Enter runs the action. Only the part after the selection, the verb, is parsed on Enter. It runs against whatever is selected at that moment.
Because of that split, you can select by touch and act by keypad, or the reverse.
What each key does
| Key | In a selection | In a verb |
|---|---|---|
0–9 | Build a fixture number, and select it as you type. | Build the value after At. |
+ | Add the next fixtures to the selection. | Make the level relative: At + 10. |
− | Remove the next fixtures from the selection. | Make the level relative: At − 10. |
Thru | Start a range. 1 Thru 8 selects 1 to 8. | not used |
. | Switch to a cell address. See below. | Type a decimal in a fade time. |
/ | not used | Scale the current value: At /50 is half. |
At | Start the verb. | not used |
Full / Out | Insert At Full or At Out. You do not have to press At first. | |
Home | After Thru, end the range at the last patched fixture. | Insert At Home. Press again to switch it to At Release. |
Time | Add a fade time. Time with no number uses the default from Settings ▸ Control. | |
Col Tmp / Tint | Point the command at color temperature or ±green instead of intensity. | |
Copy | Arm a copy. Press again to switch it to Swap. Disabled unless exactly one fixture or one cell is selected. | |
⌫ | Delete one character from the last token, then rebuild. | |
Clear | Clear the line and the selection. | |
Enter | Run the verb. The line stays on screen. | |
Enter keeps the line
After Enter, the command stays on screen. Press Enter again to run it again. For example
At /200 doubles the level on each press. The next key that is not Enter
starts a new command against the same selection.
The typed selection is kept across that run. If you typed Fix 121 Thru 172,
the line still reads that way, and not the shorter list of fixtures that were actually
patched in the range. A bare digit then starts a new selection, and
+, − or Thru extend the one on screen.
Double-tap shortcuts
These run at once. Do not press Enter.
| Press | Result |
|---|---|
At At | Set intensity to the preset percentage from Settings ▸ Control. |
Full Full | Set intensity to 100%. |
Out Out | Set intensity to 0%. |
At + + / At − − | Nudge intensity by the step from Settings ▸ Control. |
Col Tmp At + + | Nudge color temperature by the Kelvin step from Settings ▸ Control. |
Words the parser accepts
| Kind | Words |
|---|---|
| Objects | Fixture/Fix, Group/Grp, Look/Cue, Favorite/Fav, Effect/FX, Macro, Fader |
| Selection | Thru, +, − or - |
| Levels | At, Full/FL, Out, Home, Release/Rel |
| Parameters | Col Temp / Color Temperature / CCT, Tint, Hue, Sat / Saturation |
| Actions | Record/Rec, Update/Upd, Delete/Del, Recall, Copy (with From / To), Swap (with With), Time |
Go,
Select, Align, If, Freeze,
Offset, On, Col Xfd, Next and
Last. They parse without error and raise a message instead of running. The
syntax will not change when they are wired up.Levels
| Type | Result |
|---|---|
1 | Select fixture 1. |
1 Thru 4 + 9 − 2 | Select 1 to 4, add 9, remove 2. |
1 Thru Home | Select fixture 1 and every fixture after it. |
Group 2 + Fixture 5 At 75 | Select group 2 and fixture 5, then set intensity to 75%. |
1 Thru 10 At /50 | Halve the current intensity. |
1 At + 10 | Raise intensity by 10 percentage points. |
601 At Full Time 3 | Fade to full over 3 seconds. |
Fix 1 Col Temp At 5600 | Set color temperature to 5600 K. Parameters take real units, not a percentage. |
1 Tint At 50 | Set ±green to +50% green. |
1 Col Temp At −100 | Lower color temperature by 100 K. |
Home and Release
At Home returns color, beam and position to the profile defaults.
It does not change intensity. The level stays exactly where you set
it.
At Release drops every manual edit on the selection back to the live look. A
parameter the look records returns to its look value. A parameter the look does not
record, a color tweak on an intensity-only look for example, returns to the profile
default, so nothing is left behind. With no live look, Release does what Home does.
Both act on selected cells when cells are selected, and on whole fixtures otherwise.
Looks and groups
| Type | Result |
|---|---|
Look 3 | Recall look 3. A look number on its own means recall. |
Record Look 6 | Record look 6. With no number, use the next free one. |
Update | Update the live look from the current state. |
Update Look 2 | Update look 2 instead of the live one. |
Recall From Look 4 | Pull look 4's values onto the current selection only. |
Record Group 3 | Record the selection as group 3. |
Delete Look 6 / Delete Group 3 | Delete that look or group. |
Delete | With a selection and no object, set those fixtures to 0. |
Group, Look) or for Record,
Update and Delete. A Shift layer is planned. Until it ships,
use the on-screen controls for those: the group chips select groups, the Looks tab and the
header transport recall looks, and Record and Update are
buttons in the action row above the command bar. The
syntax above is what the Shift layer will type, and it is what the
playground runs.Copy and Swap
Copy takes one source: one fixture, or one cell. Select it, then press
Copy. The command bar reads Fix 1 Copy To.
- Choose targets. Tap fixtures or cells in the grid, where they outline green, or type their numbers, or do both.
- Use
+for another target andThrufor a span. - Press
Time, then digits, to fade the copy in. - Press Enter to run it.
Any other key cancels an armed copy.
Swap exchanges values instead of copying them. While a copy is armed the
Copy key reads Swap. Tap it to switch. Swap takes exactly one target, so
+ and Thru do nothing, and tapping another fixture replaces the
target instead of adding to it. The echo reads Fix 1 Swap With Fix 2.
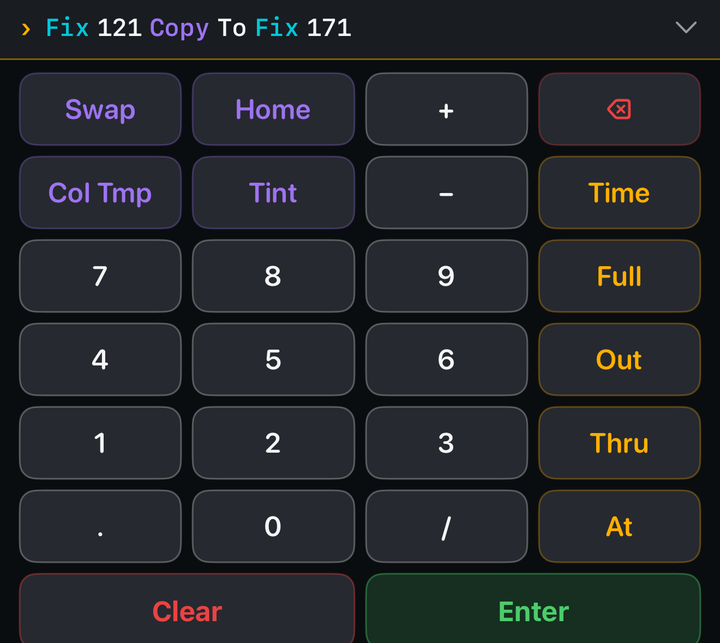
Parameters are matched by name and type, so two different profiles still work together. Every combination works: fixture to fixture, cell to cell, cell to fixture, and fixture to cell. A single source cell is treated as the master, so its values fill every destination cell.
Cells and dotted addresses
A cell is addressed as <fixture>.<cell>.
| Type | Result |
|---|---|
1.1 | Cell 1 of fixture 1. |
1.1 Thru .12 | Cells 1 to 12 of fixture 1. |
1.1 + .3 | Cells 1 and 3 of fixture 1. |
1.1 + 2.3 | Cell 1 of fixture 1, and cell 3 of fixture 2. |
1.. | Every cell of fixture 1. |
1.1 + 12 | Cell 1 of fixture 1, and all of fixture 12. |
+ and
Thru. But a number with no dot is always a whole fixture. Type
1.1 Thru .4 to select cells 1 to 4. 1.1 Thru 4 adds fixture 4
instead. This is what lets you mix cells and fixtures in one selection.You can also select a cell range by touch: tap a cell, press Thru, then tap
another cell in the same head.
Backspace
Backspace removes one character from the last token. Whole words such as
Fixture, Group, Thru, Home,
+ and − are removed in one press. The app then rebuilds the whole
selection from what is left on the line.
With nothing typed, backspace first adopts the current selection as the line. So deleting a selection you made by tapping works exactly like deleting one you typed.
Group 1 + Group 2, so the command bar always shows what is really
selected.Looks
A look stores fixture values and a fade time. The Looks tab is a grid of cards, tinted in each look's own color. A card shows the number and name, the fade time, and how many values it holds. The live look is marked ● LIVE.
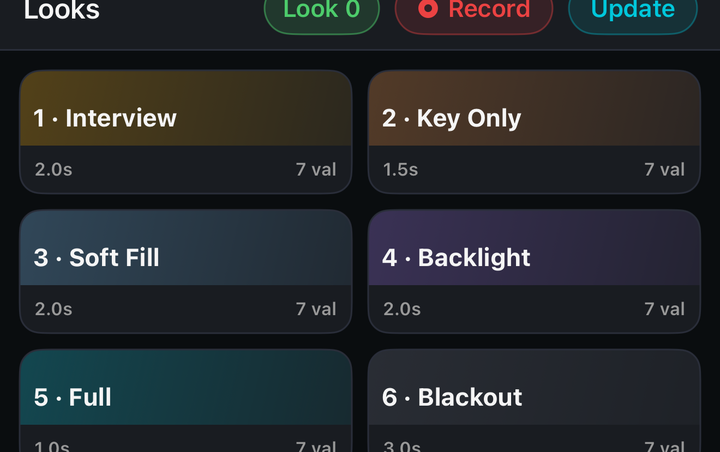
- Tap a card to recall it. It crossfades over its stored fade time.
- Tap and hold a card for Edit, Clone and Delete. Edit changes the name, the color and the fade time. It does not re-record the values.
- Transport. Red ◀ for the previous look, green ▶ for the next. It wraps around, and the same transport is in the Fixtures header.
- Look 0 in the header releases the live look and returns the rig to the fixtures' own defaults.
- Recording a look makes it the live look. Pills then switch from manual (amber) to tracking (white, or red where you have edited over it).
Record sheet: Look or Group, number, name, color, fade time (looks only), and a "Selection only" toggle. Update sheet: the look or group to apply to, with an "Apply to" picker. It has no fade field, so updating values cannot change the fade time by accident.
Groups
A group is a reusable selection. To make one, select the fixtures and choose
Record → Group, or type Record Group n. A group has a
number, a name and a color, and it appears as a chip on the Fixtures screen.
Several groups can be on at once, and the selection is their union. To delete a group,
tap and hold its chip, or type Delete Group n.
Patching
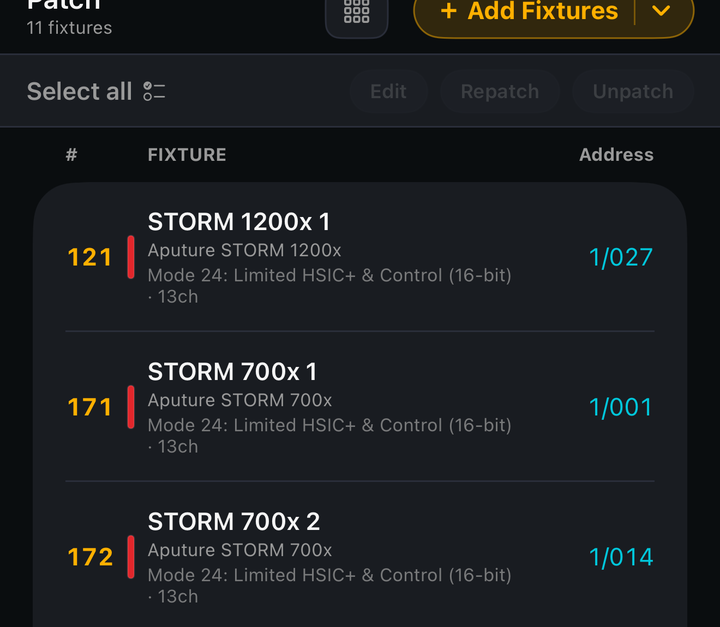
The Patch tab lists every fixture in the location. A row shows the number (amber), a bar in the label color, then the label, the manufacturer and model, and the mode with its channel count. The universe / address is on the right, in cyan. A row with a conflicting address is tinted red.
Adding fixtures
- + Add Fixtures opens one page in three sections: Brand → Fixture → Profile. It has a search field and a filter: sort by mode or channel count, and narrow to pixels, features or favorites. Star a profile to pin it to the top.
- Choosing a profile opens the config step: a label and a swatch, then steppers for Amount · Fixture Number · Universe · Address · Gap. The next free address is filled in for you.
Editing
- Tap rows to select them. The edit bar is always visible. Edit changes the label and color. Repatch renumbers and re-addresses the selection in sequence. Unpatch removes it. Swipe a row to delete one fixture.
- Overwriting. Patching over an existing fixture number, or over overlapping channels, replaces what is there. You get an inline "⚠ Will overwrite…" warning and a confirmation before anything is replaced.
Importing a patch
Pocket Console reads a patch exported as CSV from Blackout Lighting Console. Choose Import Patch, pick the file, and review the matches before they are applied. Rows the app cannot match to a profile are listed so you can fix them by hand.
Output & settings
The Settings tab controls how DMX leaves the phone.
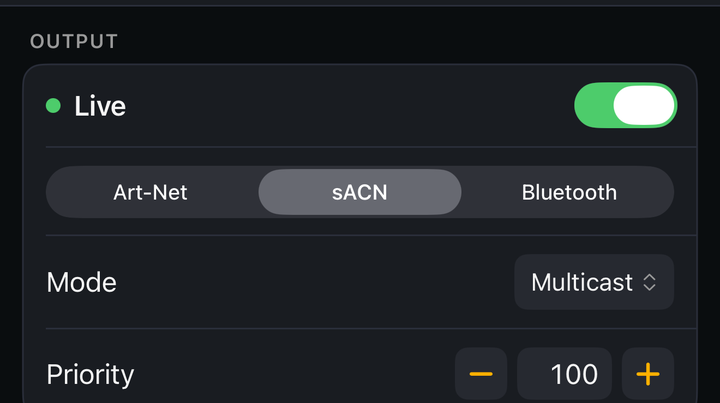
- The toggle at the top of Output is the master on/off. Below it you choose one active protocol: Art-Net, sACN or Bluetooth. Only one runs at a time.
- Mode sets how that protocol addresses the network: multicast or unicast for sACN; broadcast, directed broadcast or unicast for Art-Net. A unicast mode adds a field for the node address.
- Priority (sACN) sets this source's priority, so Pocket Console can win a universe another console is also driving.
- Universe routing maps each of your universes to an output universe. The engine streams every routed universe at approximately 40 frames per second.
- Appearance sets the selection highlight color (white by default) and the default swatch color.
- Control sets the five values the keypad and jog wheel use: wheel center double-tap, At · At level, At ++ / −− step, Col Tmp ++ / −− step, and default fade time.
Bluetooth (CRMX)
Choosing Bluetooth streams to a LumenRadio TimoTwo, either a CRMX transmitter or a fixture with the module built in. Tap Scan and pick the device. Two limits apply:
- One device, one universe. Bluetooth carries the first routed universe only. For a larger setup, use Art-Net or sACN.
- Changes only. Bluetooth cannot carry a 40 fps full-universe refresh. After the first full frame, only changed channels are sent. Levels hold exactly where you left them. Turning Output off sends one all-zeros frame, so the lights actually go out.